Hi all !! Is it just me or everyone is smitten with the grannies. For what purpose these patches are known as granny square I still dunno. But what I know is they make up a fab project much more fab-ier.
 This post is dedicated to all the newbs who would like to indulge in a granny but dunno where to go. This pictorial is a good choice for y'all.
This is a great project to finish off your scrap yarn. That's what I do at least and that's what I've done in this tutorial. You can crochet this square in a solid color as well.
Things needed
I've used acrylic yarn
3mm crochet hook
Method
Make a slip knot and chain 4. Slip st in the first chain to form a ring. You can start this project with a magic circle also.
Round 1
Now chain 3. This will work as the first DC work two DC in the ring formed. And chain 1


The chain 1 will form a corner.
Slip st to join. I've slip st till the third DC so that whenever I start it'll be from a corner and not in between the St.
Snip the yarn and fasten off. If you are not changing colors don't snip carry on with the same color.
Round 2
With a different color, pick up a corner,chain 3 and work 2 DC in the same space. Chain 2 and work a cluster of 3 DC in the same space. Chain 1


This is a great project to finish off your scrap yarn. That's what I do at least and that's what I've done in this tutorial. You can crochet this square in a solid color as well.
Things needed
I've used acrylic yarn
3mm crochet hook
Method
Make a slip knot and chain 4. Slip st in the first chain to form a ring. You can start this project with a magic circle also.
Round 1
Now chain 3. This will work as the first DC work two DC in the ring formed. And chain 1

Work a cluster of 3 DC in the same ring and chain 1 after the third DC

Next repeat a cluster of 3 DC and chain 1 two more times.


Slip st to join. I've slip st till the third DC so that whenever I start it'll be from a corner and not in between the St.
Snip the yarn and fasten off. If you are not changing colors don't snip carry on with the same color.
Round 2
With a different color, pick up a corner,chain 3 and work 2 DC in the same space. Chain 2 and work a cluster of 3 DC in the same space. Chain 1

Work 3 DC chain 2 and 3 DC in the next space. Chain 1.

Continue this pattern for each space. Remember to chain 1 before hopping of to the next space


Slip st till the last DC of the cluster until you reach a chain 2 space to join.
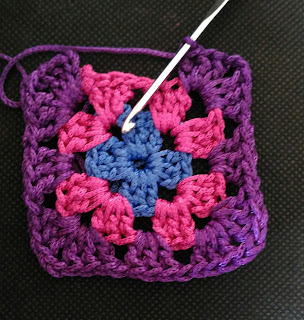
Round 3
Pick up a corner space and chain 3, 2 DC chain 2 and 3 DC all in the same space. Chain 1

Now work a cluster in each chain 1 space of the previous round. From round 3 you will now work a cluster in each space. Remember to chain 1 after every cluster to form a space for the next round.

Continue working the corners as you did in round 2 :3 DC chain 2, 3 DC.

Repeat the above pattern for the rest of the square


Slip st till the third DC of the cluster and fasten off.
Round 4
Start from a corner and repeat round 3


Viola !! You just made yourself a cute granny square. You can go on increasing and make yourself a lapghan, afghan, a scarf, a shawl and in my case bags !!!
You can find my love for grannies here:


There is no pattern for the above two bags on my blog. But it is fairly simple. The first one is made by using the given method of the granny square. I made 17 of it and joined it with SC.
The second had 13 granny square joined with SC.

You can find the pattern here


This one is a granny bottom bag. You can find the pattern here

There is no pattern for this but just take a look on the assembly for the bag

Again just take a look.

Now this one's my fav. You'll find the pattern here.

A huge tote. Though I have not written a pattern for it you can check how I assembled this beauty.
So that's it guys. Something so simple can be made into something very exceptional. Use your imagination and go ahead
I know I'm exceptionally late for this post. I should've posted this much sooner. But better late than never.
Happy crocheting !!
No comments:
Post a Comment